Category: Baking

Baking with the Boys – Easy Cake Pops For Kids

Baking with the Boys – Easy Cake Pops For Kids

Ahhhhhh Cake Pops…….

Those little balls of fudgey, soft, chocolate covered cake goodness 🙂 Whoever first came up with the idea should honestly go down in history. surprisingly they are super easy to make. While my talents are certainly no where near the type you would pay for, the boys and I adore making our own and the process of rolling and dipping these mini melt in your mouth pops is rather therapeutic. If you can get your kids to stop dipping into all the sprinkles!

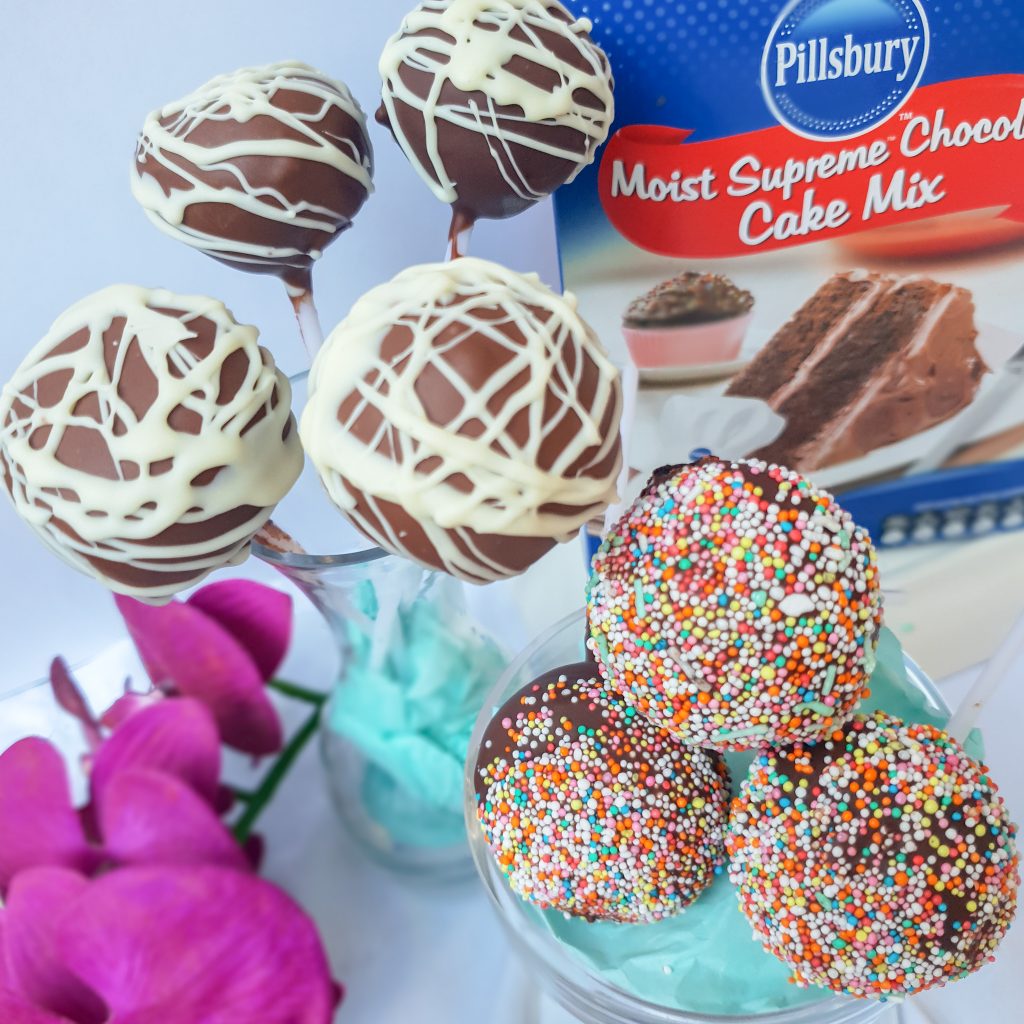
Weekend baking has always been “our thing”, and Pillsbury makes it even easier of course, by allowing us to create cakes that are perfectly soft and moist, everytime. It makes the whole session a breeze and these pops are perfect for tiny hands to dip and decorate.

Heres how the boys and I made our pops, and you can do this with any “flavour” of cake you wish. We used chocolate here, but previous have used the vanilla and red velvet as well!

Ingredients:

One Box Milk Chocolate Cake Mix

Eggs, Milk and Oil as per Box instructions

One tub Milk Chocolate frosting

One extra-large slab of chocolate

Sprinkles to decorate

Method:

Bake Cake as per box instructions. Once cooled, tip and crumble the entire cake into a bowl. (Yes crumble your entire cake, though I did leave two slices out for dad to have).

Add about ¼ cup of frosting into the cake crumb mixture and mix well.

TIP: Do not use too much frosting as your cake pops will slide down the sticks!

Once mixed mould into balls (the boys rolled the balls by hand so you don’t necessarily need a “cake pop” mould) and freeze for about 15 minutes.

Meanwhile melt chocolate in a double boiler.

Once cake pops have cooled and are firm, insert your choice of lollipop stick and dip into the melted chocolate (trying not to eat too much as you go along). The chocolate should set fairly quickly as the cake pops are cold.

Decorate as desired!


Top tips to ensure your cake pops not to slip down the stick:

If the cake pops are not cold enough when dipped into chocolate they will slip.

If they are too moist, they will slip (so go easy when you add in your frosting)

If the balls are too big, they will fall off the stick

To help them “stick”, dip your lollipop stick into your melted chocolate first and then into your cake ball. This will add as a “glue” ensuring they stay upright.

If they do slide – don’t worry!! Turn them upside down and place them into mini cupcake holders.

Enjoy!

Baking with the Boys – Lemon and Blueberry Bundt Cake

Baking with the Boys – Lemon and Blueberry Bundt Cake

The Boys and I love baking together. Actually I think its more like I enjoy baking and they love sampling, but never the less its an activity we always do together. They love to pour, measure and mix and I cherish the time we have together to do it.

I have to admit though when it comes to baking with them I often use pre-mixes as its easier for the kids to do and they can almost entirely make a cake from start to finish by themselves. The sense of pride they have when taking out a perfectly formed cake from the oven is the cutest thing to watch. Pillsbury has been one of my favourite pre-mixes to use, since I was about 14! My only wish is that their ready made croissant and sugar cookie doughs were avaliable in South Africa. I have memories of living in the states, waking up to the smell of freshly baked croissants in the house all thanks to Pillsbury. It would make my weekends that much easier if I could chuck some into the oven here!

I digress, lets talk afternoon snacks. The 3 o’clock slump in our household is a real thing. The boys are often in and out of the kitchen no less than 5 times searching for snacks. This Lemon and Blueberry Bundt cake is the perfect activity to do after school, and will be ready just in time for tea! Adding in fresh fruit takes a little of the “guilt” out for me and It also makes sure that hubby has some cake for his after dinner tea which he loves so much.

Heres how we made it:

Lemon and Blueberry Bundt Cake

 Ingredients

1 x Box Pillsbury French Vanilla Cake Mix

3 eggs, Oil and Water as per box

1 cup Blueberries

Zest of One Lemon (and a squeeze of Juice)

Fresh mint to garnish

One tub Pillsbury Lemon flavoured frosting

Method:

Mix Cake mix as per instructions on box. Add in the zest of one lemon and a little squeeze of juice.

Fold in one cup of blueberries.

Pour into Bundt pan and bake until done.

Once cooled, beat up the Lemon flavoured frosting until light, I added a dash of fresh cream to thin it out a little. Garnish with fresh blueberries, lemon slices and mint.

Enjoy!


Note: To be perfectly honest I wasn’t entirely sure about the “Lemon Flavoured Icing” as traditionally artificial lemon can have quite a sharp taste. However, this was DELICIOUS and ALL of my family commented on how “yummy” the icing was, from my 4 year old who typically avoids icing, to my husband, who considers himself quite the food critic! I will definitely be buying this one again, what a pleasant surprise.

Cadburys’ Inspired Desserts Perfect For The Festive Season

Cadburys’ Inspired Desserts Perfect For The Festive Season

I spent an evening a little while back with the Cadburys’ Team at The Cookery, on a cooking class to highlight the #CashInYourCravings campaign that was running. Like we need an excuse to indulge?

“The Cookery”, is an interactive cooking studio run by The Secret Jozi Chef, and one I have been absolutely dying to visit. It hosts fun social classes for students during the week as well as interactive chef’s table events. Perfect for girls night out or a date night with your beau. I was surrounded by luxury with state of the art Whirlpool and KitchenAid appliances and the attention to detail with the décor is absolutely on point. Keep scrolling because I’m sharing two of my favourite recipes.

We each draw a “chocolate” to select our team, I drew a PS I love you bar, which happens to be one of my favourites. There were 4 teams, each cooking three dishes that made up the menu for the night, under the supervision of Chef Emilio. The focus of the evening was of course, was cashing in on our cravings with some indulgent food such as butter sage gnocchi (yes I made Gnocchi), mushroom risotto as well as delectable desserts all made with Cadburys favourite chocolate bars, in this case, PS Chocolate Ice Cream and 5-star brownies; perfect for a Christmas day dessert.

I’m going to share the dessert recipes from the evening with you, because they really are too good not to try and so darn easy to do at home. Who on earth would have thought that I would ever attempt my own home made ice cream? This PS Ice cream is the best thing I have ever tasted and is definitely on the menu for a family feast in December. So here they are my top two recipes from the night (everything I tasted that night was on point but I have to leave you with some incentive to book a class).


CHOCOLATE BOX BROWNIES

Ingredients

240g butter, melted and cooled

2 tablespoon vegetable oil

150g brown sugar

200g white sugar

4 large eggs, room temperature

4 teaspoons vanilla extract

150g all purpose flour

120g good quality, unsweetened cocoa powder

1 teaspoon salt

270g roughly chopped chocolate or large chocolate chips  (We used chopped up Cadbury 5-Star and Crunchies for this)

Directions

Preheat the oven to 175°C then line a 7×11 inch baking tray with parchment paper and set aside.

In a large bowl combine melted butter, oil and both sugars.

Add the eggs, vanilla and salt then whisk for about one minute until evenly combined and light in color.

Over the same bowl sift in the flour and cocoa powder.

Gently fold the dry ingredients into the wet ingredients until JUST combined (do NOT over mix).

Pour the batter into the prepared pan, then smooth the top.

Generously top with the chocolate chunks, gently pressing them into the batter.

Bake for 35-40 minutes, or until the centre of the brownies no longer jiggles and is JUST set to the touch.

Remove from the oven and allow to cool to room temperature before removing from the baking tray and slicing into 16 brownies.

Enjoy


PS I Love you Chocolate Ice Cream

Ingredients

300g PS Chocolate

1 1/2 cups whole milk

1 cups heavy cream

6 large egg yolks

5 tablespoons granulated sugar (add an extra tablespoon if using bitter chocolate)

1/4 teaspoon salt

1 tsp vanilla powder (fresh vanilla pods)

1 cup cream

Directions

Place the chocolate in a blender.

Whisk the milk, 1 cup cream, egg yolks, granulated sugar and salt in a heavy-bottomed medium saucepan over medium heat. Cook, stirring constantly until the mixture is thick enough to coat the spatula and almost boiling, 5 to 6 minutes. Basically making a custard, and it’s absolutely OK if it splits bit, it’s all going in the blender!

Immediately pour the milk mixture over the chocolate in the blender.

Cover and hold the lid with a thick kitchen towel; blend until combined and smooth, stopping to scrape down the sides of the blender as needed.

Transfer to a bowl cover and set aside to cool completely in the fridge. (We placed a bowl in an ice tray)

Once the mixture is cold, whip the remaining cup of cream and fold it through the chocolate mixture.

IF YOU HAVE AN ICE CREAM MIXER – Add the mixture to your ice cream maker and churn according to manufacturer’s instructions

IF YOU DON’T HAVE AN ICE CREAM MIXER – Pop it in a container in the freezer to set. You can go in and mix it every 30 minutes but according to Chef Emilio for this recipe you don’t have too.

There you have it. Two simple recipes to add to your Christmas table this festive season. You will be blown away by the Ice-cream, I promise, Its sweet, rich but not too rich, creamy with a little crunch of wafer. The best thing I’ve tasted this year! Thank you Cadbury South Africa for this awesome treat night.

Let me know if you try these recipes 🙂

Recipe: Milo Crunchies

Recipe: Milo Crunchies

I promised some Milo inspired baking recipes this week and these Crunchies are proving to be a treat with the whole family. We recently got to experience a fantastic morning thanks to Nestle South Africa, where we learnt how to make our own MILO® Energy Cereal and its re-ignited my love for this malty drink. A Crunchie is the perfect sweet treat to enjoy with a hot drink, or as a snack in a lunch box, its also an ideal baking activity to do with kids with little hands to help you press into the tin.

This is a good old fashioned recipe, with sugar (maybe a little too much), butter, oats, coconut and flour, and of course my favourite Milo! You can pretty much add anything you like to the base of butter, flour, oats and egg.


Ingredients

1/2 Cup self raising flour

1/2 Cup cake flour

1/2 Cup grated chocolate – I used Milo Chocolate , you could also cut into chunks as opposed to grating

1/2 Cup Milo

2/3 Cup desiccated coconut

1/3 Cup brown sugar (original recipe had 2/3 cup but i found that too sweet)

125g melted butter

 1 cup oats

Grease a baking tray and preheat oven to 180 degrees Celsius

Place all ingredients into a bowl and mix

Press into baking tray

Bake for 15-20 minutes (Crunchies will harden as they cool)

Allow to cool before slicing and serve with your favourite hot beverage

All credit to mommalikeme’s beautiful mama for this fabulous recipe. The perfect weekly bake in under 30 minutes from start to finish!

Make Your Own Milo Cereal

Make Your Own Milo Cereal

Im a “Milo” Girl, I always have been and always will be. Growing up it was both my 4pm snack as well as my before bed drink and that’s never changed. Every night I still have a mug of Milo before bed and I’m passing on my love to my boys.

Since becoming a mother however I have become much more conscious of what I give to my boys and the amount of sugar in things. My youngest has the biggest sweet tooth and will happily consume anything with sugar in it. As consumers we often see “labels” like “reduced fat” or “less sugar”, but how much of that is actually real?

When Nestle South Africa launched the “Secret Moms Club” I was immediately intrigued. Anything to get more ideas on how to give my boys healthier options. Hosted by Dr Michael Mol, the event was aimed at helping moms understand exactly what ingredients go into the MILO® Energy Cereal and that the improved recipe contains ‘less sugar and more benefits’. We had no idea what we were making in the kitchen at the time, with Chef Sizwe shouting instructions on what to do and when. As soon as I saw liquid malt extract, I had a pretty good idea it may have something to do with my favourite chocolate drink. Nestle took us through making our very own Milo Cereal, which we only discovered at the end and once everything was out of the oven, so we could see first hand just how little sugar the new Milo Cereal has in it. There is nothing better then a brand that provides you with first hand experience on what they claim.

I’ll be sharing that recipe and a few more Milo inspired recipes this week. I LOVE the fact that I can make this with my boys so they can see how their morning cereals are made, plus rolling out the little balls is excellent for find motor skills!

Ingredients – this recipe yields approx 2-3 Servings

Dry Mix

5 tbsp Wholegrain wheat flour

1 tbsp Corn Semolina fine (Maizena)

2 tsp Baking Powder

1 tsp Cocoa powder

Wet Mix

3 tbsp Boiling water

2 tsp Cooking Oil

1 tsp Sugar


Milo Slurry for the Coating

1 tbsp Cocoa powder

1 tbsp Liquid malt extract

1 tbsp sugar

1 tsp Skim milk powder

1 tbsp Boiling water

1/2 tsp Vanilla extract

1/2 tsp Cooking Oil

Method

Cocoa Cereal Balls

1.Mix the flour and Corn Semolina in a mixing bowl and sift the cocoa and baking powder together into the bowl

2. For the Wet Mix, put oil and sugar in a medium bowl, add the boiling water and mix

3. Pour the wet mix into the dry mix and stir with a spoon until it comes together in a lump. Dont over mix but the mixture should not be sticky. If need be add a little more flour.

4. Divide the dough into 3 portions

5. Roll each portion into a rope shape and cut into small pieces. Roll each little piece into small balls and place on a baking tray

6. Bake in a preheated oven at 160 Degrees Celsius for about 15 minutes.

7. While the dough balls are baking, prepare your slurry.

Milo Coating Slurry

8. Put cocoa powder, sugar and milk powder in a small bowl and mix. Add vanilla essence, oil and boiling water. Mix well until no lumps.

9. Drizzle about a tbsp of the slurry over cooled bowls, mix vigorously until the cereal balls are well coated.

10. Transfer the coated cereal balls into a lined baking tray and dry in oven at 120 Degrees Celsius for 5 minutes or until dry.

11. Cool down before serving.

There you have it! Of course this isn’t the “exact” secret Nestle recipe, its been translated into relatable terms but we were all plesantly suprised at how simple it actually is. The new MILO® Energy Cereal is now in a crunchy round shape, and boasts only 1½ teaspoons of sugar per serving, a higher wholegrain fibre content due to the use of whole grains, more protein and Activ-Go, which is a unique blend of malt extract and micronutrients that play a vital role in energy release. Have a go at this recipe at home with the kids, whether you use your cereal as a dry snack or a morning meal, you will never look at your box of MILO® Energy Cereal in the same way again!


Milk Tart Recipe

Milk Tart Recipe

One thing South Africa certainly has down is some of the best “comfort” desserts. From Milk Tart to koeksisters and Malva Pudding we sure know how to make our tummies very very happy.

If a dessert has a National Day created for it, you know it has to be pretty exceptional. Yesterday, February 27th, was National Milk Tart Day in South Africa. Being a sucker for all things celebratory, of course I had to make one.

I have to admit I haven’t made a milk tart at home for probably close to 5 years, I haven’t needed to as there are so many good ones readily available. My Favorites are from Woolworths and “Upper Crust” bakery in Fordsburg.

When the craving does strike however, this recipe is pretty full proof. After so many years it still came out perfectly!

Ingredients:

For the base: 
500g (2 cups) of cake flour

65g butter

2 teaspoon baking powder

125ml sugar

1 egg

Pinch of salt

For the filling: 

4 cups of full cream milk

3 eggs

1 cup of Castor Sugar

Two Cinnamon sticks

2.5 tsps cornflour

2.5 tablespoons cake wheat flour

1 tsp vanilla essence

60g butter


METHOD

Base:
1) Cream the butter & sugar until pale, add egg and beat well.
2) Add all the ingredients until it comes together
3) Tip out into a well buttered tart pan and press into the pan to form a base. Bake at 180 degrees Celsius until lightly golden brown.

Filling:
1) Boil milk together with a few cinnamon sticks.
2) Beat eggs well, add sugar, corn flour, cake flour, salt & add to milk mixture.
3) Mix together and bring to a gentle boil until mixture thickens.
4) Add the butter & vanilla essence to the mixture. Pour onto base & dust with cinnamon powder.
5) Place in the fridge to set

Once it has set grab a cup of tea and enjoy this yummiest piece of heaven on a plate! Everyone always has different variations of Milk Tart, how do you make yours?

Valentine’s sugar cookies

Valentine’s sugar cookies

Incase you couldn’t tell my boys are a teeny bit obsessed with baking, what kid isn’t right ? They love mixing and rolling and cutting, and of course licking the bowl.


For the last few years we have made heart-shaped sugar cookies to give out to friends and teachers for valentine’s day.

There’s a lot of controversy around valentine’s and should we celebrate it, it’s just another excuse to suck in consumers, and yes, while that may be true, personally I adore the fact that there is actually a day to promote “love”. Not just love between a man and women, but love for all of those special people around us. There is so much anger and hate in the world; the fact that there is a day to bring awareness to love is just fantastic in my books. So I unashamedly celebrate valentine’s day, every single year.

Enough of the long story, here is my fail proof recipe for the perfect sugar cookie, thanks to my beautiful friend (and sugar cookie Goddess) Liezl.

Ingredients

3 cups all-purpose flour

1/2 tsp salt

1 cup (2 sticks), approx. 227 grams unsalted butter

1 cup castor sugar

1 large egg

2 tsp. vanilla

Sift the flour and salt

In a separate bowl cream together butter and sugar, add in the egg and vanilla.

Slowly mix in flour until the dough comes together.

Pull together in a bowl and chill in fridge

Set oven to 180 Degrees Celsius, roll out cookies and bake for 12 minutes

Icing

2 cups icing sugar, 3 tbsp. egg white, about 1 tbsp. warm water dependent on consistency. Beat on high.

OR, if you are low on time, head on over to Woolworths to buy their Royal Icing Mix.


Once the cookies have cooled pipe onto your cookies.

If there is one thing I despise in this world its icing sugar cookies, I honestly do not have the patience, or finesse to neatly do them. I would actually love to go on a course one of these days, but until then I let the boys do most of it with me. That way, I can blame the messiness on them ! 🙂

HAPPY VALENTINES WEEK !! Do you have any valentines traditions in your home?


Cadbury’s chocolate popping candy cookies

Cadbury’s chocolate popping candy cookies

I have a little obsession with the Marvellous Creations popping candy chocolate that Cadbury’s released a few years ago … so when I came across a cookie recipe that had the chocolate in I knew I had to give it a go. Choc chip cookies are another one of my downfalls, this recipe is really moving to the top of my ultimate soft cookie list.

It’s actually quite surprising that any of the actual chocolate made it into the cookie dough!

Ingredients

50g softened butter

100g muscovado sugar

1 egg

25g cocoa powder

125g all purpose flour

1/2 tsp bicarbonate of soda

70g of chopped up Cadbury’s popping candy chocolate.

Preheat your oven to 180 degrees celcius .

Beat the butter and sugar together until soft and creamy, add in the egg and beat again until combined.

Add in the flour, bicarbonate of soda and cocoa, at this point mix in by hand so you don’t overbeat it.

Finally fold in the chocolate bits. Scoop up a heaped teaspoon of the cookie dough and roll it into a ball between you two hands (my kids did this).

Place the balls on a lined baking tray and bake for 15 minutes .

Try not to eat all of them at once, personally I like them a little warm still so the chocolate is gooey.

Enjoy!

Classic Chocolate Ganache Cake

Classic Chocolate Ganache Cake

Excuse the absence for the past few weeks I’ve been on a whirlwind of a business trip oversea’s.

I’m back and the one thing I was craving whilst away was a proper cup of hot tea and a slice of chocolate cake.

A creature of habit, I use the same classic chocolate cake recipe time and again, with different variations, as seen below. Its timeless, quick and easy and is our all time family favourite. Continue reading “Classic Chocolate Ganache Cake”

Party Inspiration – Cookies and Milk

Party Inspiration – Cookies and Milk

So we have decided this year to NOT throw a birthday party for my soon to be 4-year-old, because he wants a slightly more expensive birthday present (A red Ferrari sports car to be exact, I think we may have to settle on a go-cart). I’ll be honest, its got me feeling like a pretty terrible mum, because If you are anything like me, you slightly obsess over children’s birthdays party. Well any party’s really. The creative side comes out and I spend months trolling the internet for ideas and ways to be original. I LOVE IT! It’s my side hobby. My bestie and I always say one day we will focus on it full-time and make it a career. I love to creative unique idea’s and I hate the stereotypical “Disney cartoon” themes, with cartoon characters plastered all over plates, though I did cave once my putting barney toppers on my sons 2nd birthday cakes. Continue reading “Party Inspiration – Cookies and Milk”